Practice anchors install (w/ pictures!)


-
Okay, I did a thing.
Yesterday I briefly outlined my plans to build a set of practice anchors in my garage.
After a quick trip to the hardware store, I got what I needed and as promised, here are some progress pics and the final result.

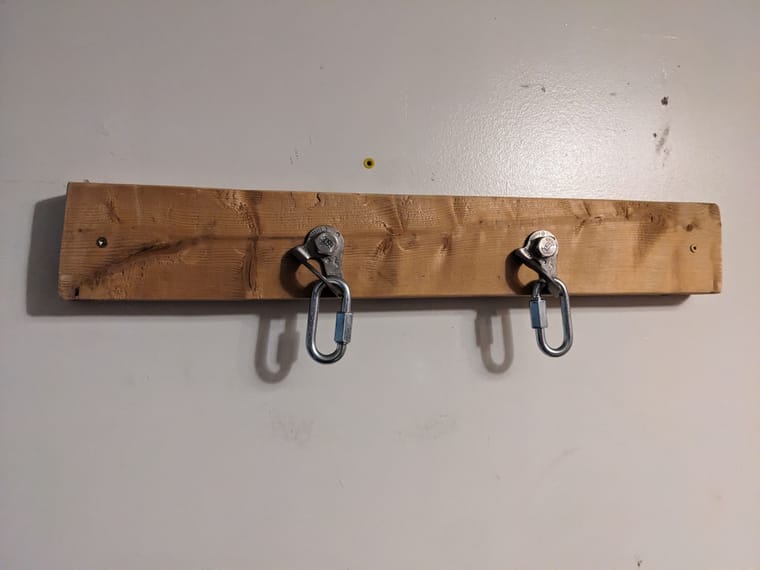
Some notes
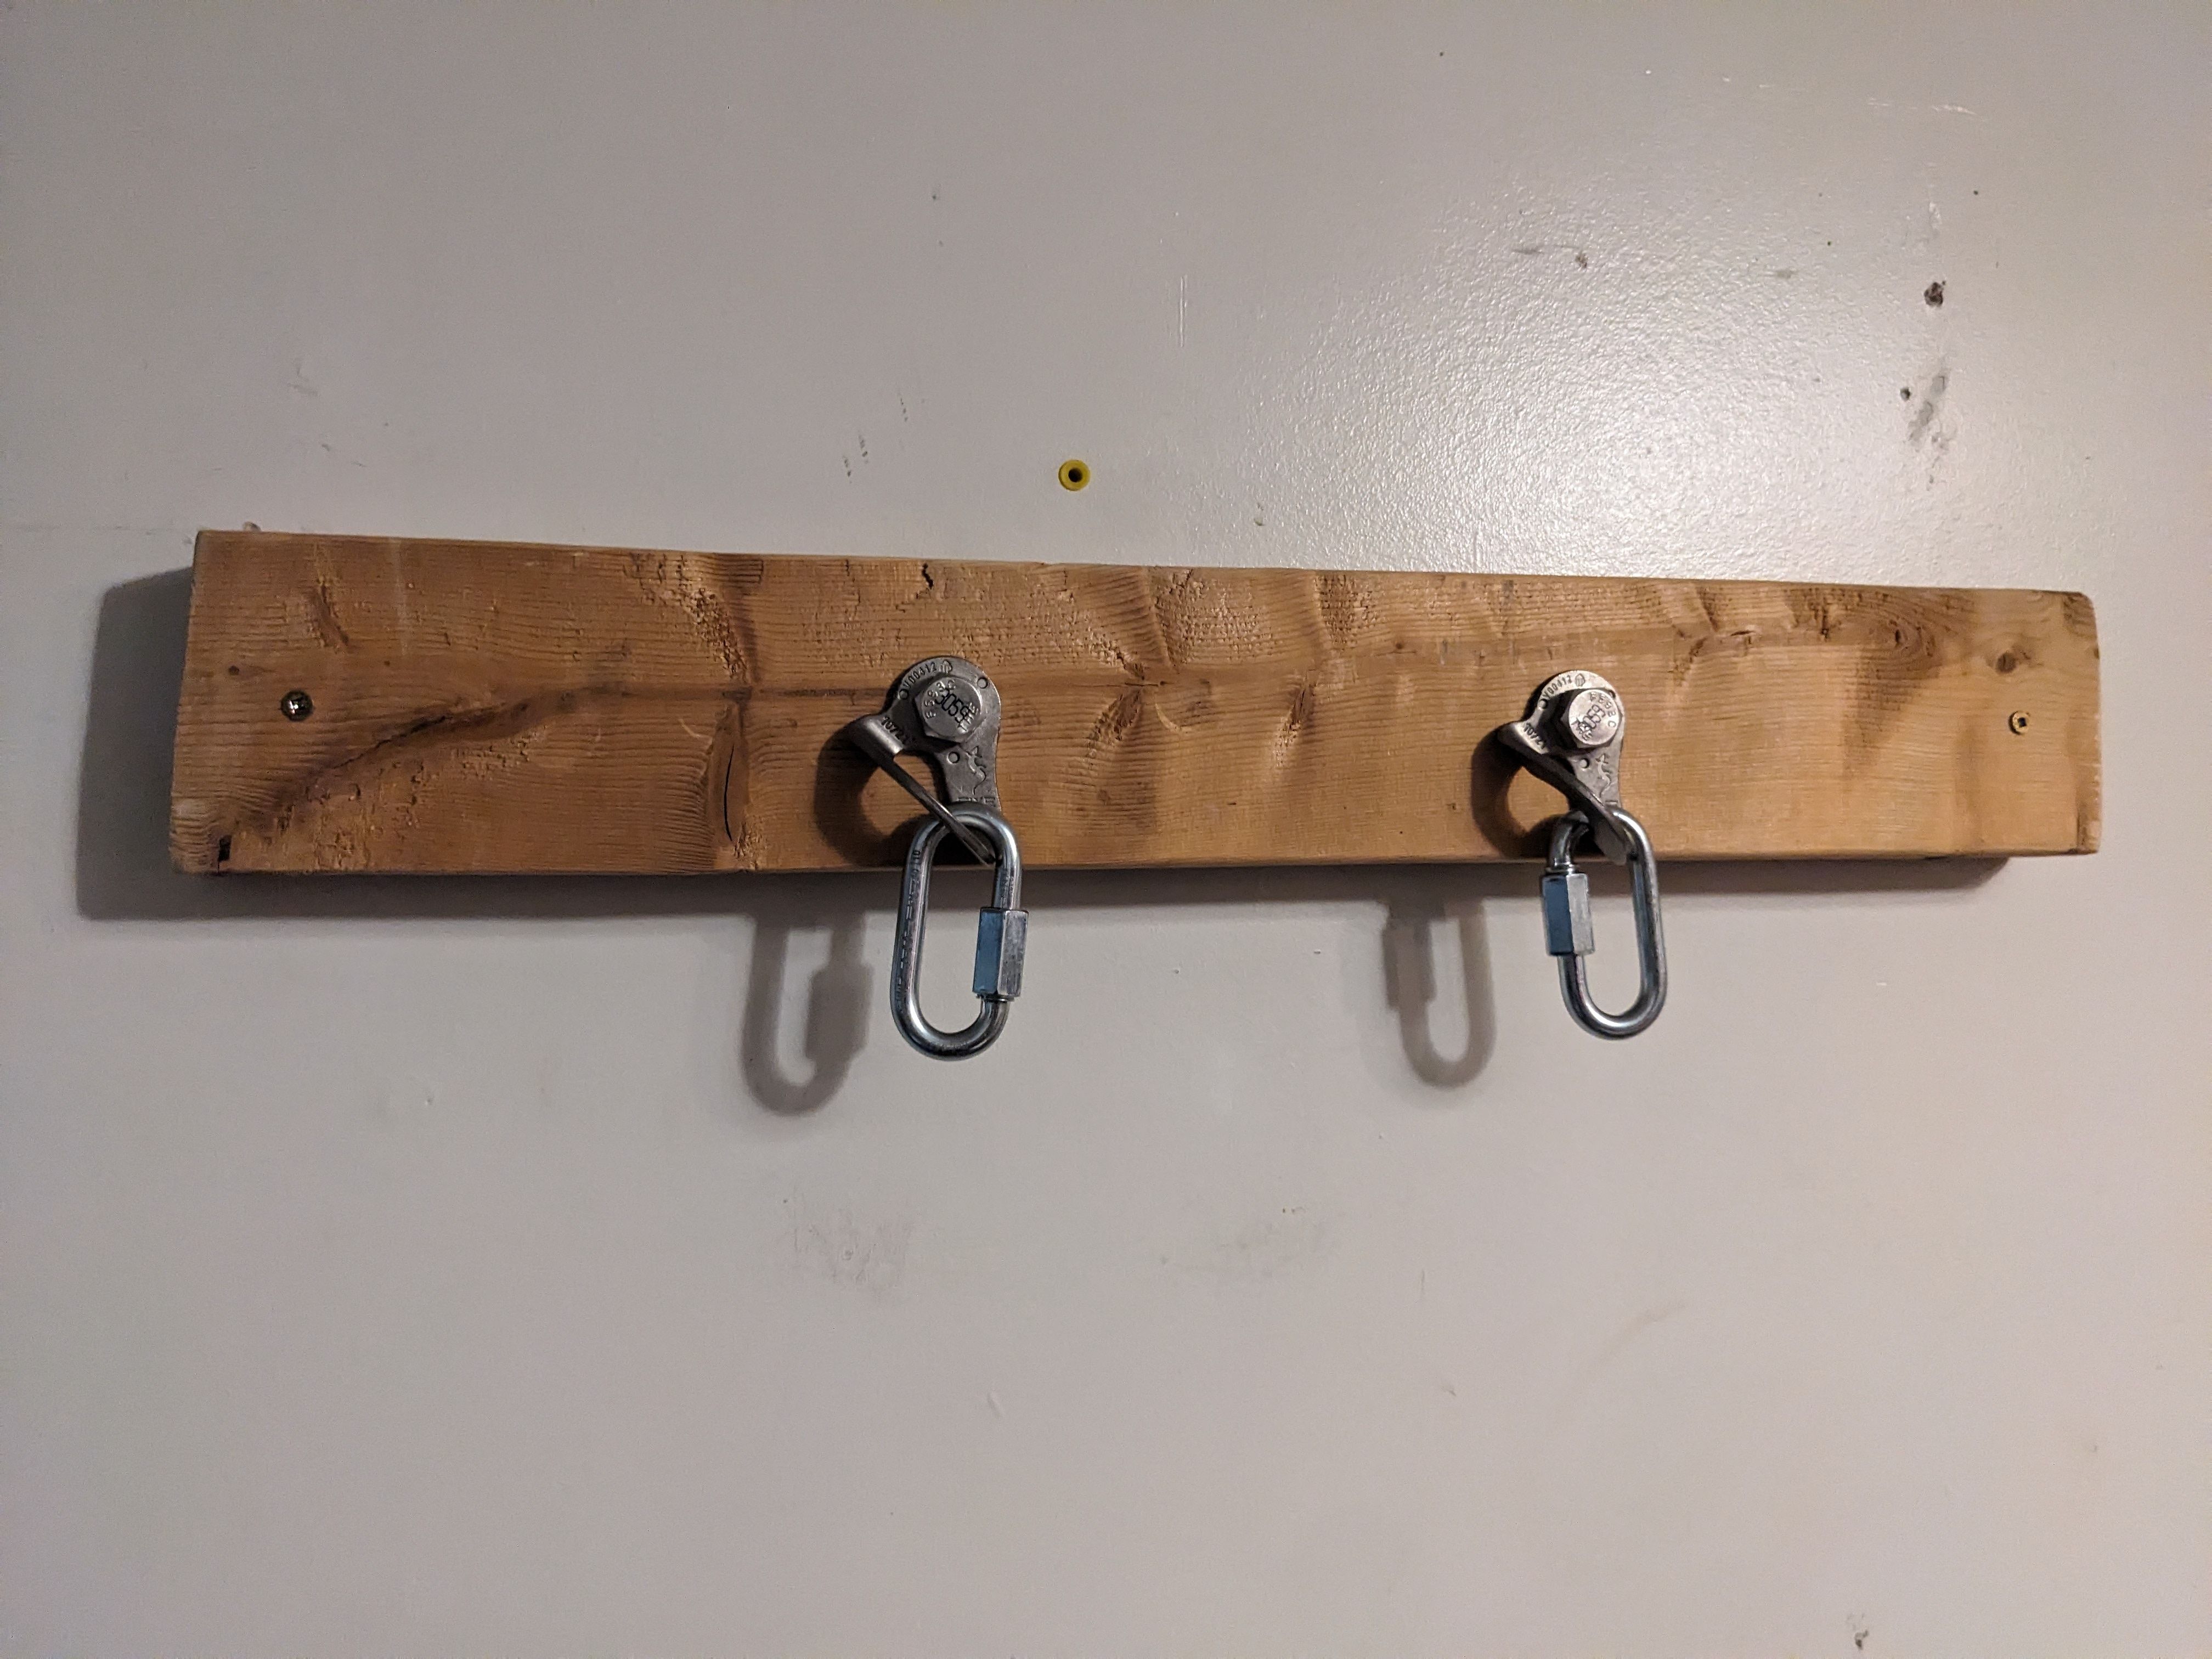
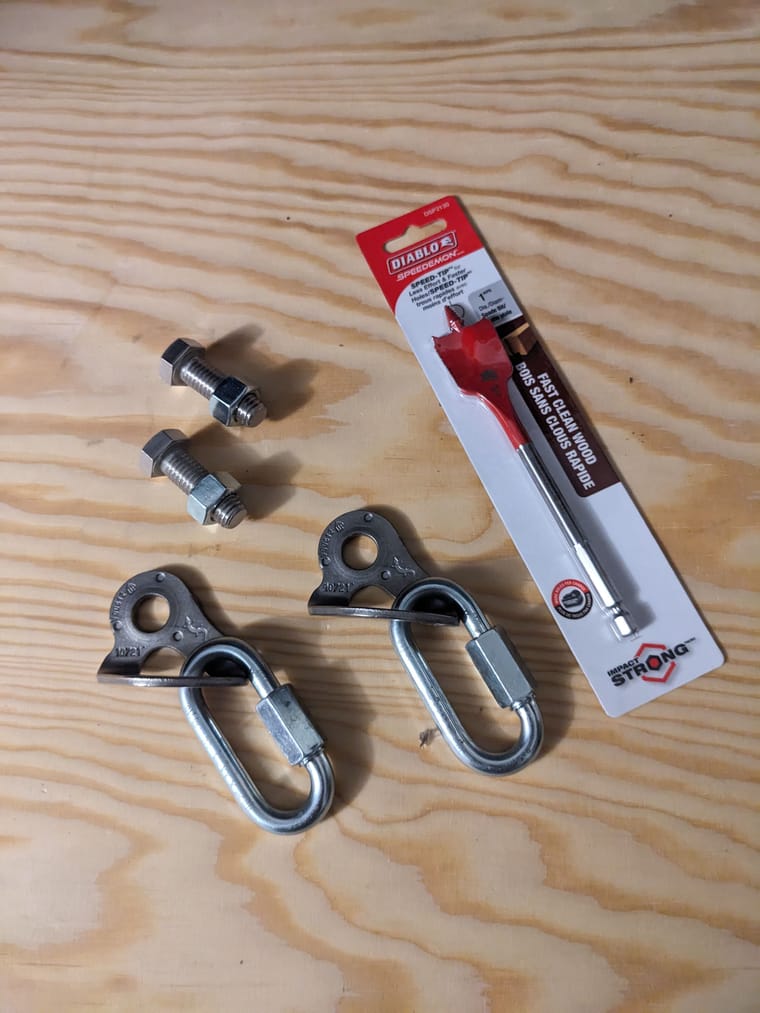
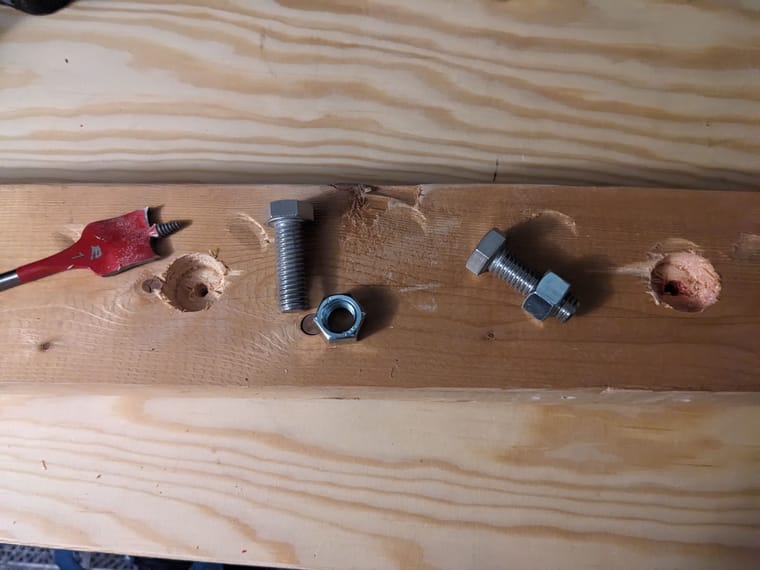
- The initial plan was to use tee nuts or threaded inserts, but I wasn't able to easily get those, so the fallback was to use regular nuts and to drill a recess into the back of the board so they'd sit flush.
- There was some splintering the first time I tried to use a spade bit. Practice makes perfect!
- I expected the studs in my garage to be 16 inches apart, but they were 21.5 inches. Measure twice, cut once!
- I was today years old when I discovered a 2x4 is not 2 inches by 4 inches.
Cost breakdown (Canadian dollars):
- Fixe 316 SS Bolt Hanger 1/2" (MEC, $2.93 apiece)
- Camp 8mm Oval Steel Quicklink (MEC, $4.95 apiece)
- 1" spade bit ($8.98)
- 1/2" threaded bolt ($3.85 apiece)
- 1/2" nut ($0.26 apiece)
- Free/on-hand items:
- Scrap wood (2x4)
- Power drill and drill bits
- Adjustable wrench and socket wrench
- Deck screws
- Total: $32.96 CAD
-
Okay, I did a thing.
Yesterday I briefly outlined my plans to build a set of practice anchors in my garage.
After a quick trip to the hardware store, I got what I needed and as promised, here are some progress pics and the final result.
Some notes
- The initial plan was to use tee nuts or threaded inserts, but I wasn't able to easily get those, so the fallback was to use regular nuts and to drill a recess into the back of the board so they'd sit flush.
- There was some splintering the first time I tried to use a spade bit. Practice makes perfect!
- I expected the studs in my garage to be 16 inches apart, but they were 21.5 inches. Measure twice, cut once!
- I was today years old when I discovered a 2x4 is not 2 inches by 4 inches.
Cost breakdown (Canadian dollars):
- Fixe 316 SS Bolt Hanger 1/2" (MEC, $2.93 apiece)
- Camp 8mm Oval Steel Quicklink (MEC, $4.95 apiece)
- 1" spade bit ($8.98)
- 1/2" threaded bolt ($3.85 apiece)
- 1/2" nut ($0.26 apiece)
- Free/on-hand items:
- Scrap wood (2x4)
- Power drill and drill bits
- Adjustable wrench and socket wrench
- Deck screws
- Total: $32.96 CAD
@devnull I got that on my to-do-list… One day it actually might happen
 I got inspired by the SkillzBoard https://skillzboard.com
 -
Okay, I did a thing.
Yesterday I briefly outlined my plans to build a set of practice anchors in my garage.
After a quick trip to the hardware store, I got what I needed and as promised, here are some progress pics and the final result.
Some notes
- The initial plan was to use tee nuts or threaded inserts, but I wasn't able to easily get those, so the fallback was to use regular nuts and to drill a recess into the back of the board so they'd sit flush.
- There was some splintering the first time I tried to use a spade bit. Practice makes perfect!
- I expected the studs in my garage to be 16 inches apart, but they were 21.5 inches. Measure twice, cut once!
- I was today years old when I discovered a 2x4 is not 2 inches by 4 inches.
Cost breakdown (Canadian dollars):
- Fixe 316 SS Bolt Hanger 1/2" (MEC, $2.93 apiece)
- Camp 8mm Oval Steel Quicklink (MEC, $4.95 apiece)
- 1" spade bit ($8.98)
- 1/2" threaded bolt ($3.85 apiece)
- 1/2" nut ($0.26 apiece)
- Free/on-hand items:
- Scrap wood (2x4)
- Power drill and drill bits
- Adjustable wrench and socket wrench
- Deck screws
- Total: $32.96 CAD
@devnull I would recommend adding washers to those nuts to prevent them from digging into the wood over time, and 4 screws on the corners to prevent the board rocking when loaded/unloaded.
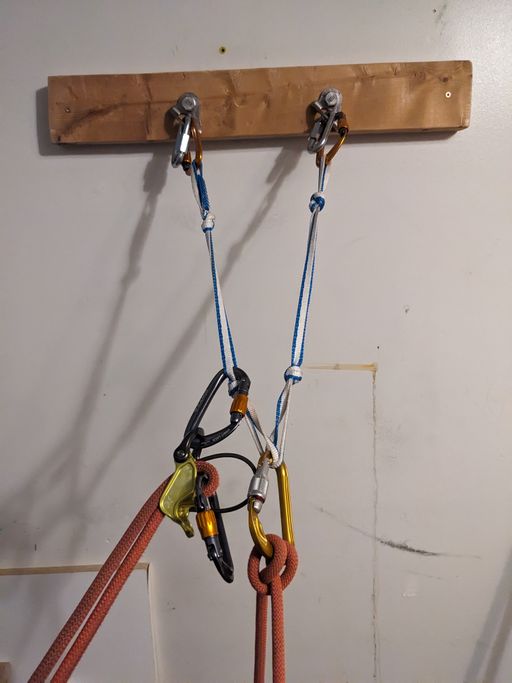
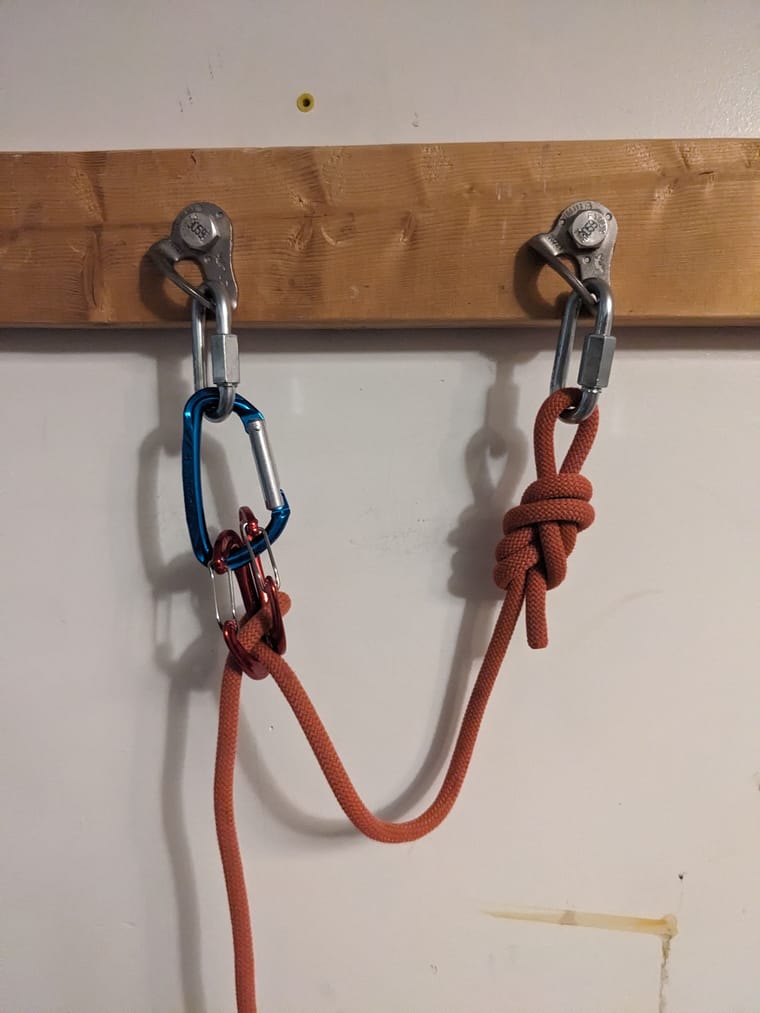
Not the typical reunion but I guess it works for simple practice.
I would tottally do something like that if I was allowed to in any case.
This is how it starts, and it ends with a climbable wall in the garage xD It's a matter of time.
-
@devnull I would recommend adding washers to those nuts to prevent them from digging into the wood over time, and 4 screws on the corners to prevent the board rocking when loaded/unloaded.
Not the typical reunion but I guess it works for simple practice.
I would tottally do something like that if I was allowed to in any case.
This is how it starts, and it ends with a climbable wall in the garage xD It's a matter of time.
@rayko@mastodon.raykoworld.com ah that's good advice! Ironically the weakest part of this board is the actual attachment to the studs.
I need to buy longer screws and put four more. That'll be "super good enough" hopefully, as a certain someone says.
@bean no flex, although I also haven't fully weighted the board just yet. I've only practiced a top belay setup so far.
-
@devnull I got that on my to-do-list… One day it actually might happen
I got inspired by the SkillzBoard https://skillzboard.comSkillzBoard
Ha! Yeah I did see this before too. It was probably also where the idea first took hold in my head.
I put in two hangers but I think eventually I'll have to add a third when testing more esoteric three-piece setups

Maybe I'll build a little crack to hold a cam...
-
SkillzBoard
Ha! Yeah I did see this before too. It was probably also where the idea first took hold in my head.
I put in two hangers but I think eventually I'll have to add a third when testing more esoteric three-piece setups
Maybe I'll build a little crack to hold a cam...
-
SkillzBoard
Ha! Yeah I did see this before too. It was probably also where the idea first took hold in my head.
I put in two hangers but I think eventually I'll have to add a third when testing more esoteric three-piece setups
Maybe I'll build a little crack to hold a cam...
@devnull Yeah, three is a must for me I think to get a grip on equalization and stuff. Not really sure I do need a board though. Might just put up three hangers on a beam in the basement.
-
Today's faffery — Garda hitch shenanigans
Want a solution to a super contrived scenario whereby you have no belay device or HMS carabiner (for a munter hitch), but do have two non-locking carabiners and still want to haul something up with a makeshift progress capture device?
-
Today's faffery — Garda hitch shenanigans
Want a solution to a super contrived scenario whereby you have no belay device or HMS carabiner (for a munter hitch), but do have two non-locking carabiners and still want to haul something up with a makeshift progress capture device?
@devnull
Funnily, #HowNot2 just shared a video a couple of days ago about tests he did with the #GardaHitch. -
@devnull
Funnily, #HowNot2 just shared a video a couple of days ago about tests he did with the #GardaHitch.@mkroehnert@social.tchncs.de indeed, that video is exactly why I even played around with it

So now one more esoteric tool in my quiver.
Hello! It looks like you're interested in this conversation, but you don't have an account yet.
Getting fed up of having to scroll through the same posts each visit? When you register for an account, you'll always come back to exactly where you were before, and choose to be notified of new replies (either via email, or push notification). You'll also be able to save bookmarks and upvote posts to show your appreciation to other community members.
With your input, this post could be even better 💗
Register Login